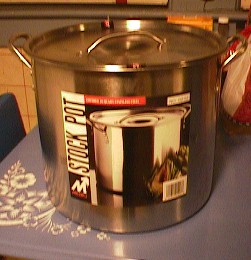
| The Gingery book calls for an empty 5 gallon metal paint bucket, but try as I might, I couldn't find one that I could beg, borrow, or steal. This is, after all, the age of plastic! There were plenty of plastic ones for sale empty, but the only metal ones I could find came filled with some noxious chemical brew like driveway sealer at a cost of $40 or $50. Just as I was about to despair, I wandered into the housewares section of the local Wal-Mart store and found... | ||||||||
(tah-dah!) A 5 gallon stainless steel stock pot!
Now we're cooking! (sorry...)
|
||||||||
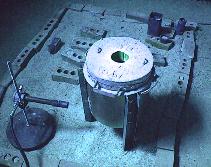
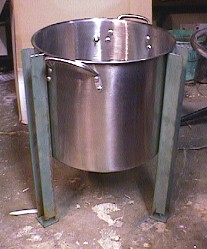
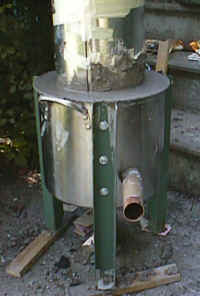
| Step 1: Lose the lid, and bolt on some angle-iron legs made by sawing in half some conveniently-shaped bits found at the local scrap yard, thusly:
|
||||||||
| Step 2: Obtain a quantity of "castable refractory cement". Just as I was ready to give up hope of ever finding any locally, a wonderful person from a local company whose name I won't mention until I get permission (Jeff - you're a stud! Hope you enjoyed the Jim Beam!) gave me two 100lb. bags of the stuff! | ||||||||
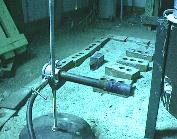
| Step 3: Prepare forms for the crucible chamber in the
center of the furnace, and the tuyere, ("tweer") where the burner is
inserted. I used a piece of 8" stovepipe, "adjusted" so it doesn't
snap permanently together when closed, to form the chamber. It has wooden supports
on the inside to keep the shape, and on the outside to keep it centered. The tuyere
is formed with a piece of 2" copper pipe, inserted tangentially into the crucible
chamber through holes in the kettle and the stovepipe, like so:
|
||||||||
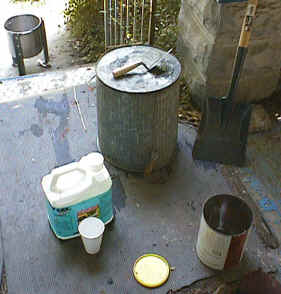
Step 4: Mix a suitable quantity of castable refractory and water in a large container using a shovel. (I had no idea what a "suitable quantity" might be, so I ended up going back to the refractory bag 3 or 4 times.) This is where it gets a little strange. During a call to the refractory company for instructions on adding water and curing, I was informed that the refractory I had been given was, in fact, designed to be applied with a high-pressure gun of some sort, where it would be mixed with water upon exiting the nozzle of the gun at a high velocity, to stick on the target surface like last week's mashed potatoes lobbed by a petulant two-year-old. Oh, and by the way, the "SS" designation on the bag? That means it contains shredded stainless steel (!!!) for a bit of added strength. How much water to use when mixing it by hand? "Gosh - we've never done that. I guess you'll just have to experiment." (Thanks, guys. You don't happen to work for the government, do you?) I determined empirically (My partner's term for "screw with it until it looks right". What do they teach kids these days? Sheesh.) that one cup of water mixed with a little more than two 1lb. margarine containers of refractory seemed to result in a reasonable consistency. Time will tell... Below is my vast array of concrete mixing and application equipment. In the background, the unsuspecting pot basks in the afternoon sun, totally oblivious to the bizarre fate in store for it.
|
||||||||
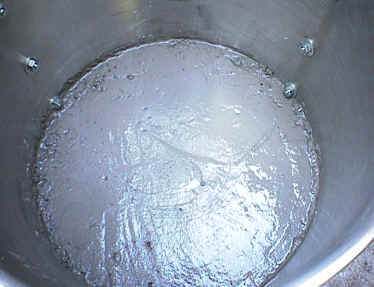
| Step 5: Here, the proto-furnace has been filled to the
tuyere hole with refractory. (And we all know how
uncomfortable that can be...)
The inner form and tuyere form were inserted, and the outside of the
furnace was packed (24 hours later) Eureka! It worked! After pulling out the center form, and
spending 20 minutes wrestling the tuyere form out, here it is in all its glory! It's
been curing for nearly 24 |
||||||||
Step 6: The lid. I thought
this would be easy, but it turned out to be the most complicated At long last, the completed lid, sitting on the completed furnace! You can see the lifting loops (in case I decide to get fancy and rig up some kind of boom and chains to lift the lid with) sticking up out of the top. Now, the whole thing has to air dry for a few days, and then we can start heating it up!
|
||||||||
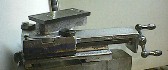
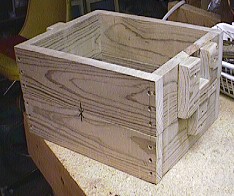
Step 7: Use your masterful woodworking skills to make up a "flask," which is a split box in which to pack casting sand around a wooden pattern of the part you want to cast, forming the mold. (Unfortunately, my woodworking skills stopped at having never quite finished a really ugly spice rack in high-school shop class, so for me, this part was much more difficult than it probably should have been. On the bright side, I had a good excuse to buy a wood plane, a miter box and backsaw, and a countersinking bit! A table saw would have made this much easier, but when you're a klutz like me, it's a lot harder to cut your fingers off with a manually operated saw!) When it's all screwed together (and who doesn't enjoy that?) it might look something like this:
I thought this part would be a drag, but I learned to cope. (A little foundry humor there. You see, the bottom half of a flask is called the "drag," and the top half is called the "cope." Get it? Drag? Cope? Oh, never mind...) |
||||||||
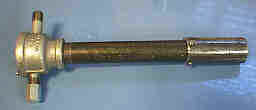
| Step 8: The very cool (but kind of
scary) "Ron Reil" propane burner. Basically, it
consists of three pieces of pipe of various sizes, and a "reducer bell",
assembled in a way nature (let alone Underwriters Labs)
never intended. In a nutshell, pressurized propane shoots down the center of a long
pipe through a tiny hole in the side of the small pipe which spans the large end of the
reducer. The reducer forms a venturi down which the pressurized propane rushes,
pulling air in around the sides as it goes. (Hey - I'm making
this up as I go along. It sure sounds convincing though, doesn't it? ;-)
When assembled according to Hoyle (errr... Ron), I hope it's supposed to look sort of like
this:
(Is it just me, or does this remind you of the old "arrow through the head" gag too?) |
||||||||
| Step 9:
|
||||||||
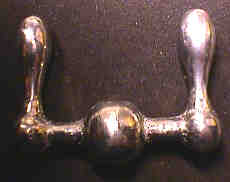
| My first casting! As a "proof of concept", (and because it's one of the cooler looking
parts of the Gingery metal
lathe project) I decided to start out with a pot-metal casting of a crank for the
cross-feed adjustment. The pattern is made of wooden beads, dowels, and some custom
wooden shapes. After gathering all the required tools and protective gear, and getting my nice new flask, sandbox, and riddle all covered with sand, I proceeded to prepare the mold. I rammed up a blank drag, flipped it over, and pressed the pattern in to the parting line. At that point began a comedy of errors. In my excitement, I forgot to apply parting dust (heck, I don't even have any!) before ramming up the cope. It was just after I had finished ramming the flask, complete with sprue pin, that I realized this fact. The neighbor's dog (the only witness) will doubtless require months of therapy after hearing my comments concerning this oversight. Nevertheless, I decided to try opening the flask. To my amazement, it split open right at the parting line, and I was able to lift out the pattern. I blew out a bit of wayward sand, placed a steel rod in the spot formerly occupied by the center dowel (this will be later hammered out to leave a properly sized bore for mounting the crank), and closed up the flask. Earlier today, I went to local scrap yard and bought a sack full of "pot metal" knobs which appear to have come from valves on hot-water heaters or something similar. I placed several of these knobs in my cast-iron syrup pot (errr... crucible...), stuck it in the furnace, and fired 'er up. In a matter of 2 or 3 minutes, the scene in the pot resembled a Salvadore Dali painting, and about a minute later, the knobs had been reduced to a pool of molten metal. I let it cook a minute longer, then removed it from the furnace and poured it quickly into the flask. It appeared to fill the sprue almost immediately, and began to pool in the funnel-shaped opening around it. At that point, I realized that in my haste, I had also forgotten to vent the mold - a sure way to get gas pockets and bubbles in the casting (or so I had read). Somewhat disheartened, I let it cool while we had dinner. Afterward, expecting to see a big lump of metal with a bit of a sprue sticking down from it, I shook out the flask (pounded it out, actually - that puppy was rammed but good!). To my amazement, the following artifact slowly appeared as I brushed off the sand:
It worked! I don't know how, or why, but it did! It was, as you can see, pretty rough, with a very definite sand texture, but I could see no bubbles or gaps! Considering it's the very first casting I have ever made, I was extremely pleased. After the driving out of the steel core, considerable cleanup with a file, and an hour or so of grinding and buffing with a Dremel tool (if you don't have one get one; you won't regret it!) I was the proud owner of this lovely object:
I did it! I made a shiny metal thing with my own hands! Now, just 137 parts to go and I'll have a metal lathe...! |
||||||||
| More to come as the action "... (Help, I can't stop!)
|
||||||||
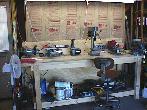
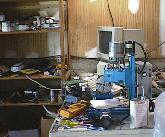
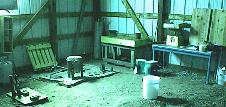
| In case you're interested, here are some pictures of my workshop and foundry setup...
|
||||||||
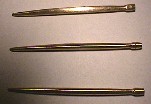
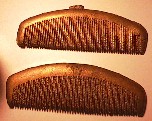
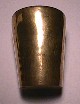
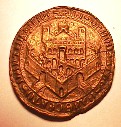
| Recently, (7/99) a couple of friends and I decided to try
casting some brass using my foundry. The hairpins and combs used carved wooden
versions as patterns. The shot glass was made using a glass one as a pattern.
The seal was made from a wax replica taken from an authentic medieval seal. (The
original had some chips in it and was broken in half.) Overall, I think they turned
out rather well. Here are the results:
(Click a picture to see a larger version) |

 with refractory. The spacer boards were gradually pulled out as refractory was added
until the form was able to maintain position by itself. It has been curing for
several hours now, and the refractory has reached the consistency of slightly damp
mud. Tomorrow, we attempt to persuade the forms to come out...
with refractory. The spacer boards were gradually pulled out as refractory was added
until the form was able to maintain position by itself. It has been curing for
several hours now, and the refractory has reached the consistency of slightly damp
mud. Tomorrow, we attempt to persuade the forms to come out... 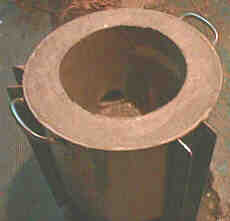 hours now, covered in
damp paper towels and a plastic bag. Depending on which information sources I
believe, I now need to either a) let it continue to dry for 24 to 48 hours, and then fire
it, or b) keep it from drying out until I can fire it. Arrrgh. What to do,
what to do? (This picture is a bit on the red side, as it was taken after dark by
the light of a 75W bulb about 12 feet away. For some bizarre reason, Ricoh chose
not to equip this particular model of digital camera with a flash!)
hours now, covered in
damp paper towels and a plastic bag. Depending on which information sources I
believe, I now need to either a) let it continue to dry for 24 to 48 hours, and then fire
it, or b) keep it from drying out until I can fire it. Arrrgh. What to do,
what to do? (This picture is a bit on the red side, as it was taken after dark by
the light of a 75W bulb about 12 feet away. For some bizarre reason, Ricoh chose
not to equip this particular model of digital camera with a flash!)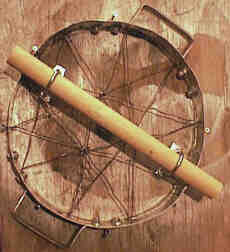 part so far. Make a cylinder of sheet metal, 2" high, with the edges folded
over and the ends riveted together. Drill holes around the edge and weave steel wire
through them to support the refractory. Figure out some kind of handle
arrangement. (Being the "belt and suspenders" type when it comes to
mechanical design, I added both side handles made from 1/8" flat steel, and loops on
top for attachment of some sort of lifting device.) I ended up with something that
looks like the offspring of an unnatural union between a Veg-o-matic and a "dream
catcher". The dowel across the top is there to stabilize the lifting loops
until the refractory is set. A piece of 3" stovepipe in the center will provide
a sight hole/exhaust port. (I don't know about you, but I've got my
doubts about putting my eyeball anywhere near a hole that's been spewing exhaust at 1800
degrees...)
part so far. Make a cylinder of sheet metal, 2" high, with the edges folded
over and the ends riveted together. Drill holes around the edge and weave steel wire
through them to support the refractory. Figure out some kind of handle
arrangement. (Being the "belt and suspenders" type when it comes to
mechanical design, I added both side handles made from 1/8" flat steel, and loops on
top for attachment of some sort of lifting device.) I ended up with something that
looks like the offspring of an unnatural union between a Veg-o-matic and a "dream
catcher". The dowel across the top is there to stabilize the lifting loops
until the refractory is set. A piece of 3" stovepipe in the center will provide
a sight hole/exhaust port. (I don't know about you, but I've got my
doubts about putting my eyeball anywhere near a hole that's been spewing exhaust at 1800
degrees...)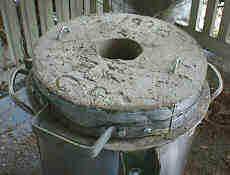
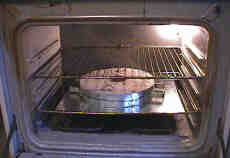 "One
furnace lid, well done, coming up!" I baked the lid at 250 degrees until tender
and flaky (oh - wait - that's the biscuit recipe...) for two hours, then cranked it to 350
for two more hours, and then up to 500 degrees for another 30 minutes or so. I
didn't know if the old oven was going to take it - it popped, creaked, pinged, and groaned
until I was afraid to leave turned up that high. The lid dried out fine, with no
visible cracks. After that, it was on to the furnace. I put on the lid, stuck
in the burner, and proceeded to make short heats of 3-5 minutes each, with an hour or so
cool-down in-between until my glasses no longer fogged over when I looked into the sight
hole. Then I ran it for about 15 minutes, put a brick over the sight hole, and let
it sit overnight. It, too, dried without any significant cracking. I think
it's done!
"One
furnace lid, well done, coming up!" I baked the lid at 250 degrees until tender
and flaky (oh - wait - that's the biscuit recipe...) for two hours, then cranked it to 350
for two more hours, and then up to 500 degrees for another 30 minutes or so. I
didn't know if the old oven was going to take it - it popped, creaked, pinged, and groaned
until I was afraid to leave turned up that high. The lid dried out fine, with no
visible cracks. After that, it was on to the furnace. I put on the lid, stuck
in the burner, and proceeded to make short heats of 3-5 minutes each, with an hour or so
cool-down in-between until my glasses no longer fogged over when I looked into the sight
hole. Then I ran it for about 15 minutes, put a brick over the sight hole, and let
it sit overnight. It, too, dried without any significant cracking. I think
it's done!